|
Mt Williamson (4,384m, 36.65610N / 118.3103W) is the second highest peak in California and sixth in the
contiguous USA, and lies
about 10/15 kms to the north of Mt Whitney (the highest peak in California as
well as in the contiguous USA).
Mt Williamson is usually approached via Shepherd Pass.
The Shepherd Pass trailhead is near Independence, California, which is south of Bishop. Getting there is an adventure in itself. As of 2011, the area is now open all year (it used to be closed in the summer). Permits are required only if you hike it in multiple days. Shepherd Pass route descriptionThe hike is much longer and tougher than Mt Whitney's main trail, as the trailhead for Shepherd Pass is only at 1920m. About 2/3rd of the way one reaches Shepherd Pass at about 3672m, then enters the Williamson Bowl, then climbs up the mountain itself. Except for this last stretch, the trail is mostly easy to follow or guess. There is usually no snow in July at Shepherd Pass. Details below. There are two trailheads for the Shepherd Pass trail, one for hikers and the other for stock. Those hiking the stock trail hike an extra 2 kms. The only reason to hike the stock trail is if you don't feel like driving your car to the hikers' trailhead (which is an adventure in itself). The trail begins in the Symmes Creek canyon. The sandy trail almost immediately crosses Symmes Creek four times. (The Symmes Creek comes down from Mt Bradley, and a south fork comes down from a ridge between Mt Bradley and Mt Keith). If the water is too high, you may skip the second and third crossings by bushwhacking along the right bank of the creek. After the fourth crossing, the trail begins the steep climb up Mt Begin (about 50-60 switchbacks). At the top, you reach a "saddle" (2770m), which is actually a series of three saddles, and cross to the other side into the Shepherd Creek canyon. From the saddle one can see Mt Williamson's north face sticking out above the hills in the south (Mt Williamson then disappears for most of the hike). Then you walk down (a 160m of altitude loss) until a fifth creek crossing (dry in summer) and then a sixth one (at the bottom of a little waterfall). You have reached (2620m) Mahogany Flats (technically that's the area way below by the creek, that the trail never quite touches). The new canyon in front of you is surrounded by waterfalls. The wall in front of you up the canyon, topped by trees, is where Anvil Camp is (3130m). Shepherd Pass is further up, at the top of the mountains that you see in front of you. The trail starts climbing up very long switchbacks. You are about to reach Anvil Camp when you cross the seventh creek (usually dry in summer). Anvil Camp is at the top of the huge waterfall in front of you, to the left of the trail's route. In 2013 this section of the trail was wiped out by a flash flood. The affected area is quite large (possibly 1km total). At one point a river of dirt created a 5-meter deep and 5-meter wide groove that cuts through the trail, so you have to find a way to descend this steep 5-meter wall and then a way to climb up the other side. This is not trivial at all because the walls are vertical and brittle. In 2020 a series of new switchbacks were created to bypass the washout. Anvil Camp is shady and foresty. Yet another creek (this one wilder than all the previous ones) needs to be crossed after Anvil Camp. Anvil Camp is a popular place to camp but actually infested with mice. Campfires are forbidden. Much better to camp a bit after it, out of the forest. Two colossal mountains can be seen to the north: the ridge leading to Junction Peak (4233m), slightly northwest of Shepherd Pass, and Mt Keith (4260m), northwest of Anvil Camp or straight north of the "Pothole".
The trail after Anvil Camp is a brutal series of steep switchbacks up rocky
terrain. The trail winds up to the right of a snow patch (many hikers lose
the trail at this point and head south instead of west) and, after Pothole
(another popular camping spot, recognizable because of the green swampy meadow),
it reaches Shepherd Pass (3672m).
The ascent to the pass is even more brutal, not only very steep but
also on loose scree (and often snow till august).
When you reach Shepherd Pass, you see Mt Tyndall in front of you (south).
Now you descend into the Williamson Bowl. (In July there is usually little snow in the "bowl" and little snow on Williamson itself). This is about 3kms past Shepherd Pass.
The so called Williamson Bowl is actually a series of little hills that separate
the lakes. Most people descend into the bowl (losing about 100m of altitude)
and then walk in between the
lakes. As you descend, it looks like there is a "bridge" leading from the
wall of the rim to the center of the bowl.
When you reach the fourth and highest lake (3733m,
second on your right),
coast it to the left (east) and start ascending towards a
"black stain"
(36.65432N, W118.31733W)
left by the snow. (There is usually
a snow patch on its right, in which case you want to aim for in between the
two). Most likely you will find a use trail created by all the hikers who
do the same thing.
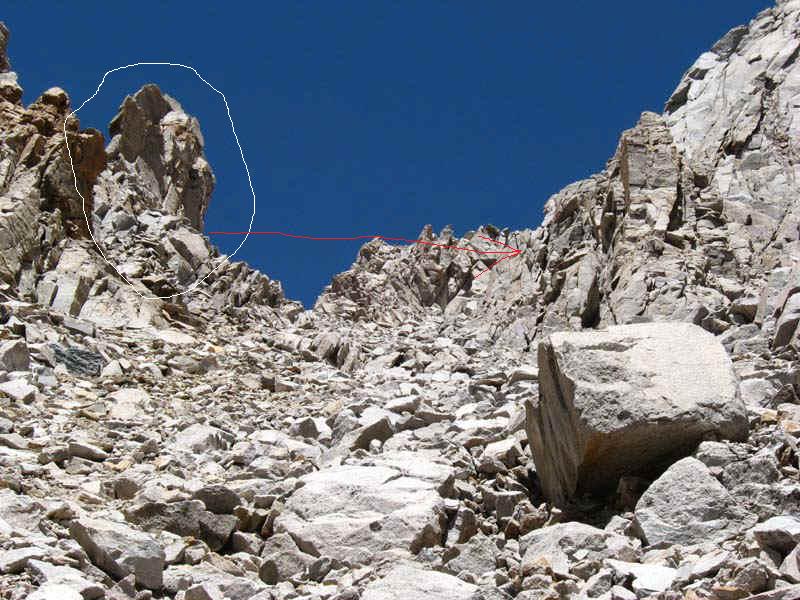
The moment you reach the altitude of the black stain, you will notice a
wide chute that goes straight up diagonally above the black stain.
The real summit is 200m to the left (south) of this western summit and is just a pile of darker and smaller boulders. It is not visible when you emerge from the chimney. It can be reached from the western summit in ten minutes. (I have read this section described as an "easy scramble" or "short walk": at that altitude nothing is easy or fast, and the boulders are truly annoying regardless of how little tired you are). See my pictures for more details. 
If you are in good shape, estimate six hours to Shepherd Pass, six hours to the summit, 10 hours back down non-stop. There is water at good intervals. Don't forget that on the way back you will still need quite a bit of water for the last devastating hill, the saddle (which is actually three saddles). If attempting a day-hike to Williamson, there are several factors to consider (besides the distance, of course): 1. the heat, which on a sunny day beats the Grand Canyon; 2. the saddle, which comes at the end of such an exhausting to hike; 3. the bowl, which takes pretty much the same time in both directions. (Contrary to what advertised on rangers-friendly websites, the Saddle could be avoided by making a more sensible trail. This Saddle exists because of a combination of stupidity, always in vast supply in government bureaucracies, laziness, also in vast supply, and lack of funds. Experienced hikers in fact climb along the Shepherd Creek from an unmarked road south of the official trailhead, thus avoiding the Saddle). Approximate distances and times:
The town of Independence, the trailhead and the mountains: 
North Bairs Creek route
This is the most direct way to the summit, and possibly the easiest, especially downhill. This is a totally cross-country route. (On the Internet i have found several warnings that this route is forbidden in the summer, but i saw absolutely no signs saying so. As far as i can tell, the route is perfectly legal). To reach the trailhead, take Foothill Rd like going to the Shepherd Pass trailhead, but don't turn right at the sign for Shepherd Pass trailhead. Continue straight, past the Shepherd Creek sign. Eventually the road climbs and reaches a point where a creek physically runs through the road. That's the North Bairs Creek. There isn't much of a parking lot. On the northern side of the creek, there is a use-trail that leads over the ridge. Stay on the ridge and climb whenever you can. The creek comes down from very deep gorges that would be very difficult to hike. You are better off staying high on the north ridge until you find a notch to climb to the other side. There are many notches. It depends on how high you are willing to climb. The higher and lower notches:
Once on the other side, you need to maintain your elevation as much
as possible while walking upstream. If you lose elevation, you will have
to bushwhack. Staying at the same elevation may involve a bit of class-2
climbing and a lot of slipping on the sandy gulch. Up above the canyon is
the cirque. The route should be obvious: at some point the creek forks,
and the left branch comes straight down from the cirque. From the notch it
looks like a "ramp" leading up (southwest) to the cirque.
Landmarks:
George Creek routeAnother way to climb Mt Williamson is via the George (or Georges?) Creek drainage. This is a totally cross-country route. It is an odd alternative to the traditional Shepherd Pass route because it involves a lot of bushwhacking without the reward of the Williamson Bowl. However, downhill it might be a better alternative.There are two ways to reach the trailhead. The orthodox way is to drive west on Market Street/ Onion Valley Rd in Independence and turn left onto Foothill Rd. Turn left as if you are going to the Shepherd Pass trailhead (see directions for Shepherd Pass) but at the sign for Shepherd Pass keep going straight (south) instead of turning right to go to that trailhead. After about 10 kms and two creek crossings (feasible with regular cars), you reach a fork: if you bear right, you go to the South Bairs Creek trailhead, if you go left you get to another fork. At that fork, turn right to reach the George Creek trailhead. Needless to say, it takes a lot of patience to drive all that distance on a bad unpaved unmaintained road, and chances are that something has happened to a section of the road, so you will have to drive all the way back. I personally discourage this route. You can also get to the same trailhead from the Manzanar National Monument. As of 2011 there was absolutely no sign to get to the George Creek trailhead. Some websites and books talk about a road that starts north of Manzanara, but that road has collapsed and has not been fixed (as of august 2011). Just north of mile 66 on highway 395 pay attention to the bridge marked as 48-14R (this is a very visible sign). If you get to Manzanar, you went too far. Just after this bridge, turn left into an unnamed exit ramp (waypoint II) This is paved for just one minute and bends left. Right after the bend, the pavement ends and you're on your own. You get to a triangle-shaped junction (waypoint HH). Turn right and you'll get to a four-way kjunction (GG). Turn left and you'll drive over a bridge (15 Tons sign). Turn immediately right at the colossal three-way junction (FF). There used to be a gate but you probably won't notice it. Drive to the end of this road where the other gate used to be and turn right (EE): you will be passing three roads on your right marked for Los Angeles City. Ignore them. Turn right only when there is no Los Angeles sign. You will be coasting barbed wire on your right. Turn left when you can (DD). Now you are on George Creek road or 14S03. Stay there for a long time. This is a rocky road but i have done it with a low-clearance vehicle all the way. At the end (CC) you get to a three-way junction with a collapsing sign. You can only read the bottom (Onion Valley Rd) but the top used to say George Creek (this sign had disappeared in 2014). Turn left (if you turn right, that's the beginning of what is known as Foothill Rd). This gets more and more sandy. Eventually you reach a point (AA) where only a 4WD vehicle can continue, but you are sio close to the trailhead that it is not worth it. Park there and camp there. From there it's a 15-minute walk to the end of the road, which is the creek itself. Waypoints according to my old GPS:

See also these pictures George Creek drains the southeast slope of Mt Williamson. The route is all class 1 and 2. For a description of the George Creek route going uphill, see the Mt Barnard page. After you cross the George Creek (look for "the jump" on that page) and start heading towards Mt Williamson along its north branch, stay on the right. This is a very wide drainage (even further up at the top where it collides with the Williamson Bowl). There are several chutes on that side of the drainage and almost all of them take you to the ridge. One favorite is the "red chute". If you follow the tree line to the right as you enter the drainage of the north branch, you will enter the red chute. This chute is steep but never more than class 2. It intersects other chutes at about one-hour intervals. It takes about 4 hours to reach the Bairs plateau (the glacier/lake where the South and North Bairs are born).
The most difficult part comes here: there is a wall to climb in order to get from the Bairs plateau to the summit plateau. Easier is the right side, but a lot of zigzag required.
Once on the summit plateau you still have to find the right summit, which is less easy that you'd think (unless there are hikers making noise at the top). The grand total from the moment i entered the red chute was about 6 hours. Pictures of the red chute from different angles:
Further up the north branch drainage there's a place where you can climb to the ridge relatively easily. Here are these two routes: The steep drainage of north George Creek: Downhill you are better off taking one of the steep chutes from the Bairs plateau. From the summit head down trying to stay on the ridge. Eventually you will get down to the Bairs plateau. The moment you hit this plateau there is a wide chute on your right. This is probably the fastest way to get down. This took me an hour, all the way down to the first little creek. Then stay left of the water and circle around the mountain heading southeast and eventually just east. If you get too close to the water, the bushwhacking gets intense (and the mosquitoes may become ferocious). If you stay too high on the mountain, however, you have to deal with sand and rocks. At some point the canyon narrows so much that you have to stay near the water. You can find "use trails" on both sides of the creek. Most likely, you will keep wading the creeks to find better terrain. Climb high on the southern side to find the best use-trail (as of 2013). When the canyon makes a right turn and forces you to wade the creek again to the other (northern) side, you are less than one hour from the end. You should be able to find better and better marked "use trails", as people started exploring this area since 2012 (when the summer hiking ban was lifted). Just remember that the dirt road where your car is parked is on the northern side of the creek (so if you are staying on the right side of the creek while going down you may miss it). If you are on the northern side of the creek during the "bends", it comes as a surprise when the use trail turns sandy and then it gets wider and then you realize you are on a dirt road with signs about camping. South Bairs Creek route
Yet another route to Mt Williamson is via the South Bairs Creek. It requires less bushwhacking than the George Creek route although it is more complicated than the North Bairs Creek. The trailhead for Bairs Creek is located 3 km north of the one for George Creek. If you are coming from Manzanara, follow the above directions to go to the George Creek trailhead but instead of turning left at waypoint CC turn right and continue about 1 km until you pass a cattle grid. It is not trivial for low-clearance vehicles to reach this point. Right after the cattle grid there is a steep road on your left. Yet another collapsed sign reads 14S104A. That 500 meter road takes you to a small parking lot with a lonely tree. These narrow, sandy 500 meter road is passable only by 4WD vehicles. (Note: you don't actually see the South Bairs crossing Foothill Rd because it goes under a culvert). There was a use-trail on the southern bank of the creek (left side when you are heading upstream), but today this "use trail" is rarely visible. The honest truth is that there is no sign and there is no trail. From the very beginning you won't know which one is the use-trail. Walk straight a little bit and it will appear. The first 200-300 meters are unusual, as the trail stays on the slippery (southern) slope of the creek but then it does what it will tend to do for the rest of the route: it follows the creek upstream staying about 50 meters highers in broad flat places (horizontally flat, vertically very steep) and it is usually located at the edge of these broad passages. You lose it in the forest but you can locate it again if you pay attention to the broad passages. If you are slipping, then you are either too low or too high and you can't find the broad passages. The trail is rugged and steep. Even where it is well marked, you will be tripping over all sort of garbage: scree, gravel, dead wood, roots, boulders. It never leaves creek trail too far, but the creek is unreachable because of the very steep banks. The first landmark is the spherical spire that you need to climb via a short class-3 notch. On the other side the use-trail is actually easier to follow. The next landmark is the first major split in the creek. The left side goes straight east towards the vast cirque in front of you, the right side climbs a forested chute. You have multiple choices. The use-trail, which at this point is just a groove, goes straight towards a pre-cirque chute that climbs gently towards the ridge of the cirque. This route takes you to the George Creek route, but first you need to bypass several peaklets. It is basically a way to do the George Creek route without the bushwhacking. The second option (mainly if you want more shade and you enjoy rock climbing) is to climb the forested branch of the creek and reach the northern ridge, the ridge that separates the South Bairs from the North Bairs. This ridge has an infinite number of peaklets. Stay lower, to the left of them, and you should find a way to hit the top of the cirque much closer to the summit. The catch is that whenever you climb too high you may find yourself in class-4 chimneys. Follow the animals: if you see animal tracks along that ridge, along that ridge they are probably going where you are going, and they know how to avoid the chimneys. The corret route stays lower than the ridge and involves a number of gentle ups and downs. It eventually hits the George Creek route much higher, just before the cirque of the North Bairs (of course). The third option is to continue all the way to the cirque, a grueling bouldering uphill walk, I don't think any of the chutes at the very end of the cirque are feasible (if they have snow, that might depend on your crampons). The chute that is certainly feasible is the one that comes right after the waterfall, This very broad chute can be climbed both from the right and from the left. Again, don't overdo as there is no need to get to the very peak of that chute: once you reach relatively flat terrain, turn left and follow the animal route, up and down for a bit, and then eventually straight up the ridge to join the George Creek route.
For all southern routesWhether you picked the George Creek, the South Bairs or the North Bairs routes, you arrive at the lower plateau.
This is a 30-40 degree wall of scree that is not fun to climb, especially after such long approaches. The alternative is to head straight up the southern face through this chute:
At some point it should be obvious that there is a way out of the chute to the right, and that drops you just about at the top of the summit plateau, passed the headwall. From there it is still a long and grueling walk and class-2 climb to the summit but nothing too scary. Shepherd Creek route descriptionThe shortest (but not fastest) route is to start on Foothill Rd just before the Shepherd Creek crosses the road (shortly after the turnout for the Symmes Creek trailhead). Lots of scree and vegetation (and sometimes high water) can makes this route a real torture. However, you don't have the loss of elevation of the saddle and you completely bypass Shepherd Pass. The Shepherd Creek forks at 2200 meters of altitude (N36.70267 - W118.28970): take the left (southern) branch which is the Williamson Creek, coming down from the Bowl. |
Pictures of these hikes
Sierra mountains View from Mt Williamson (video) Mt Williamson weather Highway 395 Lone Pine chamber of commerce Bishop chamber of commerce Sightseeing Directions the Shepherd Pass trailhead: From Hwy 395 in Independence, turn west on Market street, drive 7 kms to Foothill road, turn left. The road is not paved but wide for a while. The first parking lot (2kms on Foothill Rd) is the stock trail. The road turns left and narrows considerably. In theory, only 4WD can go beyond this point. If you want to reach the hiker's trail, keep going on this very dusty collapsing road, and turn right at the next two forks. It's about 2 kms further down than the stock trail, which means that it saves you 2kms of hiking. The road is in terrible conditions (2013). It occasionally gets re-graded, but within two years it returns to its state of "quasi-impassable". It easily takes 30 minutes from Independence to the trailhead. There is no campground, but one can just pitch tent at the trailhead and leave the car there. There are no bear boxes and there is no drinkable water. Despite a big sign that you are entering "bear country", there have been no reports of bears anywhere on that trail (and i would love to see any bear who decides to come down to the hottest desert north of Death Valley). Bear canisters are not required if you camp anywhere along that trail (as of 2008). I am not sure why the sign says that "you are entering bear country". It is way too hot in the summer for a bear to survive, and even in other seasons there seems to be no evidence that bears ever used this canyon. If it's a hot day and you have anything smelly in the car, you might just leave it there or hang it from the only tree in the parking lot. Check with the rangers what is the current recommendation (it changes every year depending on which person you talk to). Just don't leave it under your car because ferocious ants and rodents will get to it. Directions the the other trailheads: see below in the description of each route. Nearby peaksOnce you get to Shepherd Pass, you are on a plateau with many 4000m mountains.Mt Tyndall (4273 m) can be hiked from Shepherd Pass in two/three hours. Caltech Peak, Mt Keith and Junction Peak can also be hiked from Anvil Camp or Pothole or Shepherd Pass. PermitsYou do need a permit if you plan to camp on the trail. Check with the Inyo National Forest. Both the ranger offices in Lee Vining and Bishop issue permits. I am sure it will eventually change as the bureaucracy keeps getting worse, but, as of 2008, no permits were required for one-day hikes. But this could change as the Inyo National Forest keeps increasing its bureaucracy as it gets more and more money (mainly though the Whitney permit system) and therefore it can afford to hire more and more bureaucrats. Make sure to boycott any initiative meant to increase funds for the Inyo National Forest: those funds are mainly used to hire more staff to enforce more bureaucracy to ruin your experience in the wilderness.Note that the Inyo rangers seem to have no clue about trails and routes. and might just be mere bureaucrats handing out permits and selling souvenirs. This is a serious mountain that should not be taken lightly, and your best source of information is the hikers you meet on the mountain or at the trailhead. Google Earth maps. All trailheads:
Four routes to the top of Williamson:
Routes to the top:
George Creek route
Bairs Creek routes:
North Bairs Creek route:
North Bairs Creek route:
And see my own pictures of all of these |


